LatestWordfence Download(Premium),可在线更新。WordPress是非常知名的开源建站程序,全球范围内高达40%的网站使用WP搭建This has led many unscrupulous people to focus on WordPress to do some damage or hacking or other actions.
Every day there are countless programs that automatically scan websites built by WordPress worldwide, some are spamming, some are planting Trojan horses to do bad things, some are stealing quality articles and so on. Firewall plug-in must be installed, in addition to security can also intercept some unfriendly robot program greatly reduce the burden on the server as well as to protect the article content from theft.
Wordfence official website data ↓

In fact, the most powerful Wordpress security plugin is the paid version of Sucuri, which has a CDN level firewall. However, it does not have a GPL version, the original version is very expensive, and it will slow down the loading speed. iThemes Security and All In One WP Security are also good, but the features are not as powerful and comprehensive as Wordfence.
Wordfence is one of the best security plugins for the general public, with the best price/performance ratio, the most comprehensive features and the best protection. You can limit the number of login attempts, block malicious bot crawlers, block fixed IP/region access, block malicious traffic, enable 2FA login verification function, etc. Maximum security!
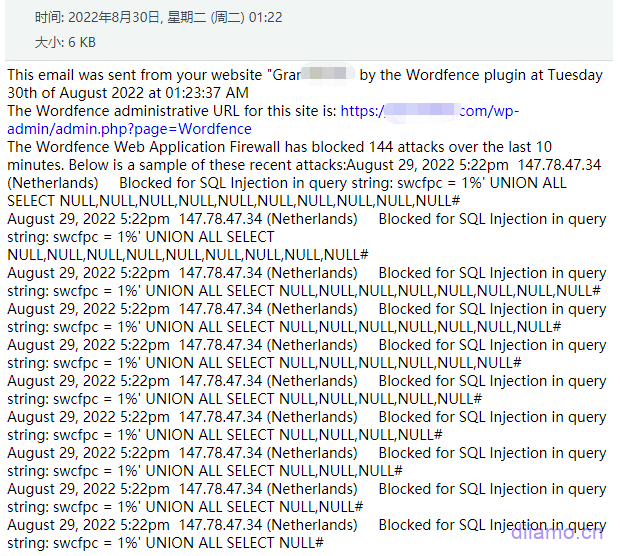
The image below is the notification email sent to the administrator after the SQL injection attack on the website was detected and successfully blocked by Wordfence.
Automatic blocking of malicious crawlers.

WORDPRESS Firewall
Web Application Firewall identifies and blocks malicious traffic. Built and maintained by a large team of 100% dedicated to WordPress security.
[Premium] Real-time updates of firewall rules and malware signatures via Threat Defense Feed (30-day delay for free version).
[Premium] Real-time IP blocking list blocks all requests from the most malicious IPs, protecting your site while reducing load.
Protect your site at the endpoint for deep integration with WordPress. Unlike cloud alternatives, it doesn't break encryption, can't be bypassed, and won't leak data.
Integrated malware scanners block requests that contain malicious code or content.
Prevent brute-force attacks by limiting login attempts.
WORDPRESS Security Scanner
Malware scanners check core files, themes and plugins for malware, bad URLs, backdoors, SEO spam, malicious redirects and code injection.
Real-time updates of malware signatures via Threat Defense Feed.
Compare your core files, themes and plugins with the content in the WordPress.org repository, check their integrity and report any changes to you.
Fix changed files by overwriting them with the original original version. Delete any files that do not belong in the Wordfence interface.
Checks your site for known security vulnerabilities and alerts you to any issues. Also alerts you to potential security issues when plugins are closed or abandoned.
Check your content security by scanning file content, posts and comments for dangerous URLs and suspicious content.
Check if your site or IP is blacklisted for malicious activity, spam generation or other security issues.
Login Security
Two-factor authentication (2FA), one of the most secure forms of remote system authentication, is available through any TOTP-based authenticator application or service.
The login page CAPTCHA blocks the bot from logging in.
Disable or add 2FA to XML-RPC.
Block administrator logins using known compromised passwords.
WORDFENCE Center
Wordfence Central is a powerful and effective way to manage the security of multiple sites in one place.
Effectively assess the security status of all your websites in one view. View detailed security findings without leaving Wordfence Central.
Powerful templates make configuring Wordfence a breeze.
Highly configurable alerts can be delivered via email, SMS or Slack. Improve signal-to-noise ratio by utilizing severity level options and daily summary options.
Track and alert on critical security events, including administrator logins, password compromise usage, and spikes in attack activity.
Free for unlimited sites.
Security Tools
Use real-time traffic to monitor visits and hacking attempts not shown in other analytics packages in real time; including the source, their IP address, time of day and time spent on your site.
Block attackers by IP or build advanced rules based on IP ranges, hostnames, user agents, and referrers.
Wordfence Premium offers country/region blocking.
Note: In the dashboard and other places will show similar to the following picture, suggesting that the current version is free version, advanced features are not available. Just ignore it, all the advanced features have no effect on normal use. If you care, please do not buy! There is a user who intentionally picks a fight with the display of the following picture, and wants us to deal with it. Explained for a long time the other party still do not understand, directly refunded black.

this isGPL version of the plug-inI don't need to care about this tip, so this place shows this, the functions are used normally. That user should be the plug-in resale or used in other people's websites, take the crack version as the genuine publicity, his customers find him trouble, he came to me here to find fault. To be 100% perfect, please go to wordfence official website to buy!official version.
What is GPL plugin
This plugin is a GPL licensed product and is safe and legal. Click to learn what isGPL AgreementClick to learnWordPress official website about GPL. Simply put using the GPL license plugin/theme source code open source sharing, can be legally free to change, use, distribution.
The company that owns the plugin/theme mentioned in the title of this item is not affiliated with us in any way, and the company has not licensed its products or brands to us. This product is a distribution of the plugin/theme mentioned in the title, created by a third party company/developer and redistributed by us under the terms of the General Public License (GPL).
We use the plugin/theme name for the sole purpose of identifying the plugin/theme on which this product is based, with the intention of helping users better understand the functionality and possible application scenarios of our product, and in no way to impersonate or mislead. This product is sold under and respects the terms of the GPL license agreement and ensures that users are aware that they are acquiring a distribution of the plugin/theme based on an open source license. They are allowed to view, modify and redistribute the software to promote its free use and development.
Verified by Security Antivirus
Directly from foreign formal channels to buy, do not modify the source code. All plug-ins we use to build their own sites, used in a number of sites, safe, stable and reliable.Are you worried that the plugin is not secure? Check this articel:Is WordPress Cracked Plugins/Themes (Green, GPL, Nulled) Safe?.
- ByVirustotal Antivirus Verification;.
- ByWordfenceSource code review.
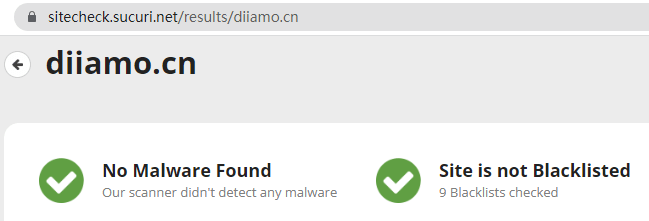
- BySucuriSecurity antivirus scan.
Wordfence update method/record
This plugin can be updated online in the background, and update directly by clicking Update when there is a new version.
Click to view the update history of this plugin (Changelog)
Wordfence Download (Premium) Terms of Purchase
This site plug-in purchased from foreign sites, the purchase price is4.99 USD/pcIt is valid for 2 years. Diamo unified selling price of 19 yuan / piece, valid for life, and spend a lot of energy to create the use of tutorials also provide manual question and answer service, absolutely worth the money. The plug-in is only for learning and exchange research, virtual products are reproducible, once sold no refund, please move to the detailsTerms of Service.
Diamo for the purchase of users to provide after-sales service, plug-in use any questions please leave a message in the comments below, there will be answers to questions.
How to install/enable Wordfence
Because it can be updated online, we have not uploaded the latest version of the installation package. Please disable and then enable the plugin after installing it, it will prompt to update the version. Configure the firewall after updating the plugin online.
如果安装了免费版本,需要先uninstallation免费版本,清理所有缓存。如果同时启用免费版本和高级版本会提示错误,只安装这里购买的版本就行。
直接上传安装包安装,启用插件,然后需要禁用插件,再刷新页面。这样会提示更新版本,先在线更新到最新版本,启用插件。
再按下方操作跳过激活↓,就可正常使用插件:
WordFence官方现在要求需要注册账号绑定才能使用插件,无论免费、付费版本都是如此,所以安装后会提示下图内容。

先点击下图右上角“RESUME INSTALLTION”。如果没显示,直接进入插件设置界面,也会有相应提示。
![]()
Then you will be prompted to click on the "GET YOUR WORDFENCE LICENSE" button to be redirected to the official website.

Click the blue button in the image below.

会弹出下图窗口,点击“I'm OK waiting 30 days for protection from new threats”,这个才是获取免费证书!

输入邮箱,选No,勾选同意条款,点击蓝色按钮,会发送邮件到你邮箱。没看到邮件?去垃圾邮箱找找。

You will receive an email with the following content, click the blue button ↓.

会自动跳转到你网站后台,自动输入许可证,点击“安装许可证”。

When the following image is displayed, click "Go to Dashboard".

Displays that advanced versioning is enabled.

设置教程和常见问题看下方教程。
Installation method 1: Upload and install
Find and click on "Plugins" > "Install Plugins" in the left menu bar of the website background, then click on "Upload Plugin" in the upper left corner, upload the downloaded zip installation package and click on "Install Now", after installation, click"Enable Plugin"Complete the installation.
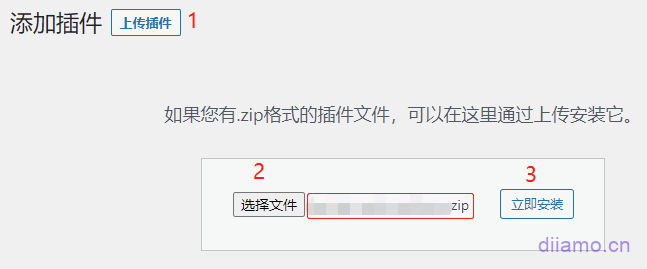
Installation method 2.FTP installation
Unzip the plug-in package, put the unzippedFoldersUpload it to the plugins directory (xxx.com/wp-content/plugins).
Find and click on "Plugins" > "Installed Plugins" in the left menu bar of the website background, find the plugin in the list of plugins, and click "Enable".

It can be updated online, just update it directly in the background.
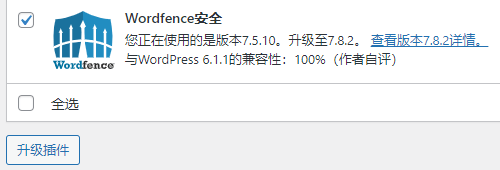
Wordfence Premium如何启用、配置防火墙
After installing the plug-in, a prompt will appear at the top of the site as shown below, and the firewall will need to be configured before it can be enabled. Click the "Click here to configure" button.

方法1
The number 1 there will automatically select the appropriate type according to the server situation, do not care. Click the number 2 in order, 3 steps to operate.
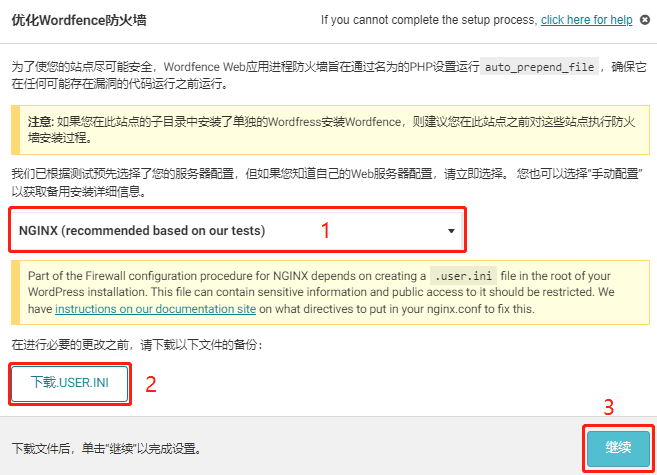
Normally it will prompt successful installation, clear cache refresh and finish firewall enable.
If the installation fails to prompt the following, it is because the .user.ini file permissions are locked, resulting in the content not being written.

There are 2 ways to solve this problem, 1 is to manually edit the .user.ini file to add content, 2 is to use SSH login to lift the .user.ini file write restrictions (2 methods to choose 1 on the line, it is recommended that players move to edit), and then back to the site background according to Wordfence plug-in prompts and then enable the firewall can be.
Manually edit the .user.ini (Recommend):
Go to the root of the site through the admin panel or FTP, find and open the edit.user.ini file![]() . By default there is only one line of content as shown in the figure below.
. By default there is only one line of content as shown in the figure below.

Copy the following 3 lines of code and putxxx.comChange the URL to the one in the yellow box on the top image of your .user.ini file, then paste the 3 lines of code into .user.ini and tap Save Changes.
; Wordfence WAF
auto_prepend_file = '/www/wwwroot/xxx.com/wordfence-waf.php'
; END Wordfence WAF
The image below shows what it looks like after pasting 3 lines of code ↓.

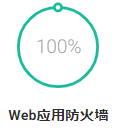
Go back to the plugin settings dashboard screen and refresh the page, at this pointFirewall is 100% enabled.The firewall protection is enabled. If it is not enabled after refreshing, it is due to cache, clear all cache and refresh.

SSH unrestricted .user.ini writes (Not recommended, reduced security):
To log in using SSH, type the following directly and press enter to unrestrict.
Change xxx.com to your site's domain name![]() .
.
chattr -i /www/wwwroot/xxx.com/.user.ini
This is what it looks like after pasting![]()
This is what it looks like after pressing the Enter key![]()
Finally go to the pagoda panel, go to the site root folder and find the .user.ini file ![]() Click on "Permissions."
Click on "Permissions." ![]() . Check all permissions and click "OK".
. Check all permissions and click "OK".
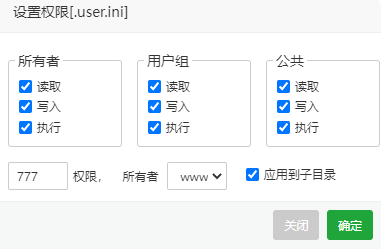
At this point and then re-enable the firewall according to the above tutorial will prompt a successful installation ↓.

Refreshing the site cache and refreshing the page again, the dashboard shows that the firewall is 100% enabled.
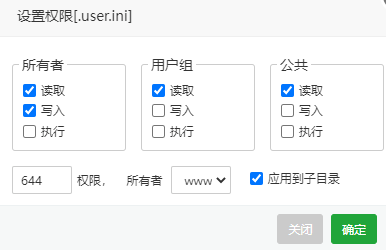
Note: Be sure to go back to the pagoda panel, according to the following chart to change the .user.ini file permissions back to 644, sometimes the site may not be modified successfully, ignore.
方法2(Not recommended, reduced security)
Note: This method is mainly suitable for shared (hosting) servers or VPS servers with only one website. If the VPS server hosts more than one website, you need to turn off the "anti-cross-site attack" on the other websites (which will reduce the security of the website), otherwise the other websites cannot be opened. It is recommended to use method 1 to install.

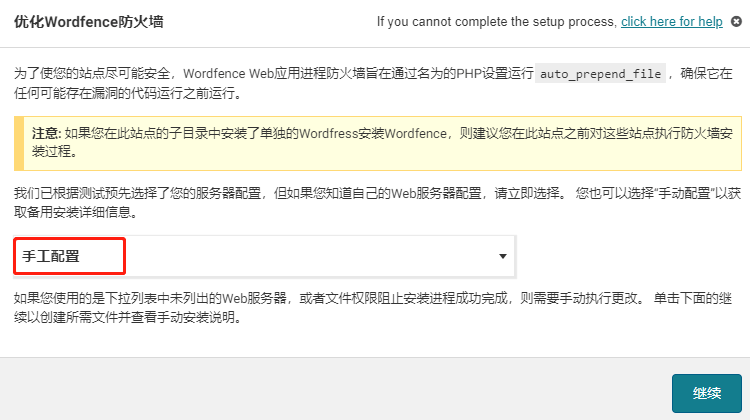
If it is a shared (hosted) server, it should be activated automatically after following the above diagram. If it is a VPS Nginx will prompt to install auto_prepend_file = '/www/wwwroot/xxx.com/wordfence-waf.php'
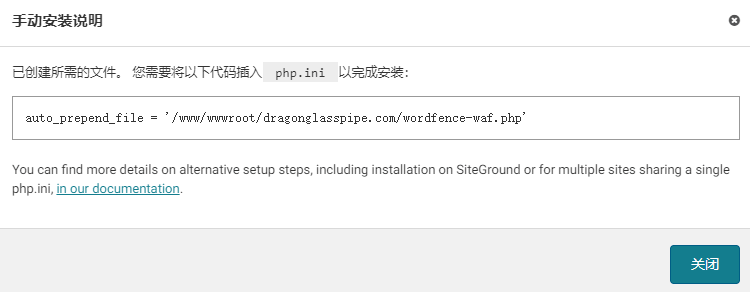
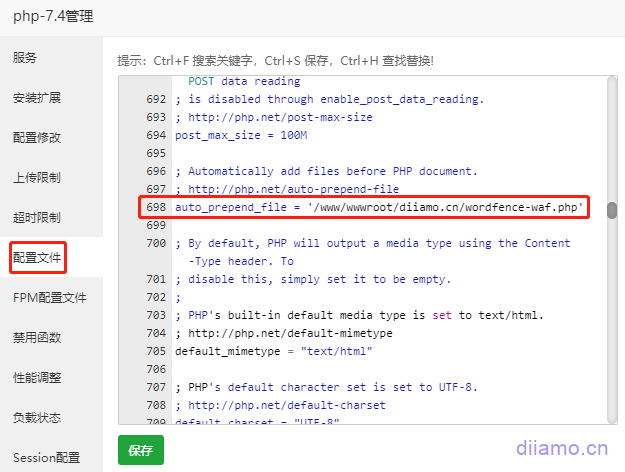
Take the pagoda panel for example, inside the PHP management > "configuration file", about 698 lines to find"auto_prepend_file ="This content, supplemented with the code of the interface prompt later'/www/wwwroot/xxx.com/wordfence-waf.php' (This code is just an example don't copy and paste directly!) Then refresh the pagoda panel memory, go back to the site background to refresh the page cache, advanced firewall has been enabled (showing 100%).
Enable 2FA secure login authentication
2FA is a double-factor authentication, which requires a verification code when logging in (no need to go over the wall) and functions similar to a bank U shield or an electronic password. It is recommended to turn on 2FA secure login verification to greatly improve security.
Click on "Login Security" in Wordfence on the left side of the backend, and then click on "Settings" at the top. Here you can set what role you want to enable 2FA secure login authentication, and choose whether you want to make login authentication mandatory or free (Optional). Generally, only your company's back office administrator and so on will enable secure login, customers and so on are not recommended to open.

Click on the check box below and tap "SAVE" to save. This will require verification the first time you log in to your new device, and no verification for the next 30 days.
![]()
![]()
Click on " at the topTwo-Factor Authentication"Enter the binding authenticator interface. Phone first go to Google Paly or Apple Store to download Google Authenticator software (below), if you can't open the Google Store click this linkDownload Android APK installer.

Back to Wordfence's "Two-Factor Authentication"interface (below). Open the just-installed Google Authenticator software, click on the bottom right corner of the software that colorful circle + sign, select "Scan QR code", scan the Wordfence interface in the QR code to complete the site binding. At this point Google Authenticator will display a line of information: Wordfence (xxx.com), (you may need to click "Click to reveal PIN") will display a 6-digit verification code, enter the red box in the following chart "ACTIVE " in the red box below.
You will be prompted to download the recovery key, click on it to complete the binding. The recovery key can be used as a backup solution to log in to the website without the verification code, so keep it safe.

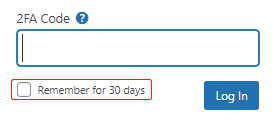
The next time you log in, you will be prompted to enter 2FA Code, open the cell phone authenticator software, enter the 6 digits inside the software and click "Log In" to log in. Check the "Remember for 30 days" box and you won't need to enter the verification code when you log in to the same device within 30 days.
Wordfence setup and use tutorial
Setting method click to viewWordfence setup tutorial.
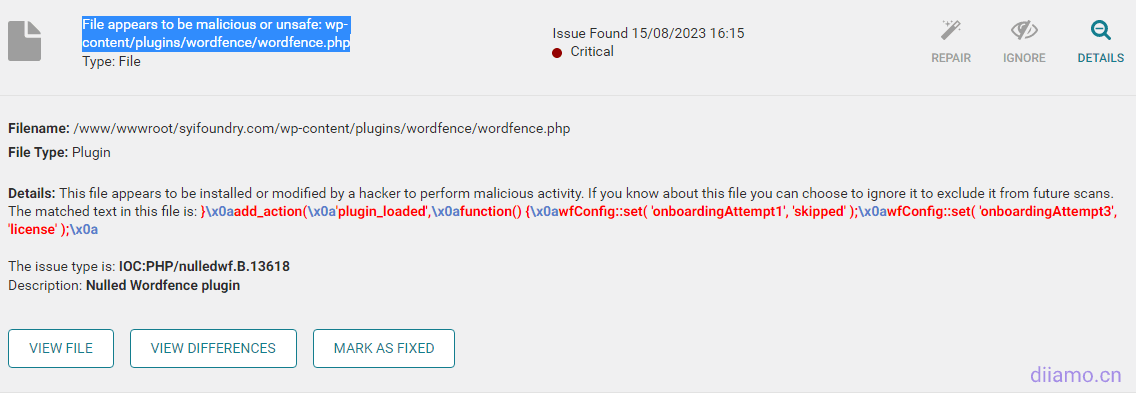
If the scan prompts the content shown below, click Expand Details.

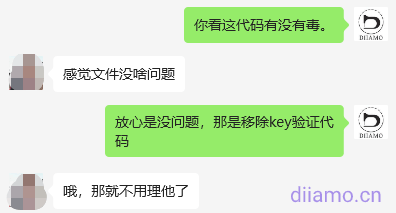
The red code in the picture below does not exist in the official source file, so it suggests that it is poisonous. That's the code to remove license key verification, not a virus, just ignore it. If you are not sure, you can copy the code and put it into the freeKimi AI ToolsAsk if it's toxic.
Common Problems & Solutions
Scanning Failure
Many times the scan fails to prompt the following text error because the server is stuck and does not have enough resources to support the scan. After solving the server problem, you can continue scanning.
Update 2024.08.30: Today's plugin update version improves scanning performance and reduces the burden on the 30% server, dependable.
"There was an error connecting to the Wordfence scanning servers: cURL error 28: Resolving timed out after 10001 milliseconds"
FAQ1: If the scanning process automatically pauses and prompts the following content, it is generally because the server is busy scanning timeout.


Solution.
1- Change the max_execution_time to 1000 or more in the pagoda panel under PHP Settings > Configuration changes.

2- Add the following code to wp-config.php in the root of the website and save the file.
define('WORDFENCE_SCAN_FAILURE_THRESHOLD', 600);
3- In Wordfence Plugin > "Scan" > "Scan Options and Schedules" (middle position on the right).Scan level select "high sensitivity"Find the "Performance Options" setting and change the maximum execution time to 25. Find the "Performance Options" setting and change the maximum execution time to 25. Check the "Use low resource scanning" box if the server configuration is very low, otherwise don't check it.
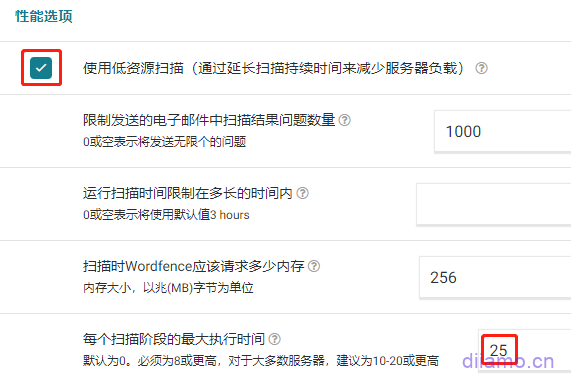
Operation after the above 3 steps to refresh the page point rescan should return to normal. If the scan still fails, it should be the server card, configuration below 1H2G or too many pages and so on. Modify the "scan options and plans", uncheck the following content to reduce the amount of scanning try.


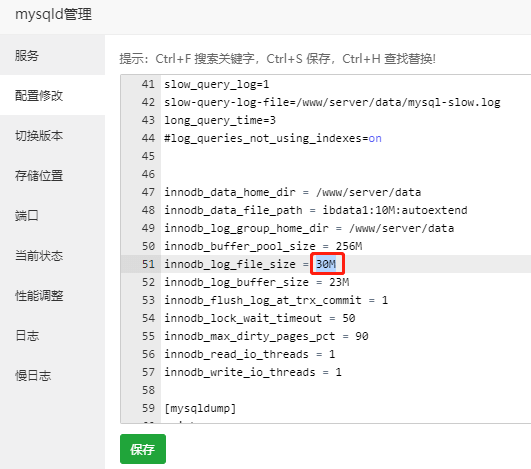
If the scan process automatically pauses and prompts the following content, it is caused by the small size of innodb_log_file_size (default is 5M).

Go to pagoda panel > "MySQL" > "Configure Changes" > about 51 lines, change the value of innodb_log_file_size to 30M. Save and restart the database. Refresh the page and rescan to restore normal.
Unable to save files, products, keywords
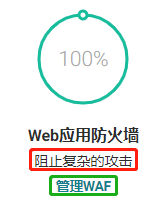
2) If you encounter that you cannot save articles, products or some plug-in settings, etc., it may be blocked by the security plug-in, turn on the learning mode to solve the problem. Click Wordfence > "Firewall". The red box below indicates "blocking complex attacks", which proves that it is not in learning mode.
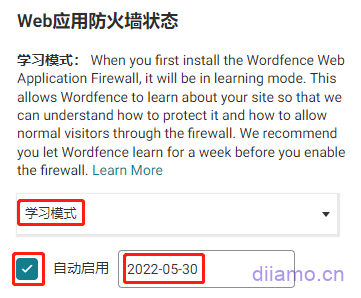
Select Learning Mode, check Auto Enable, and select an auto enable date. Tap "Save Changes" in the upper right corner.
![]()
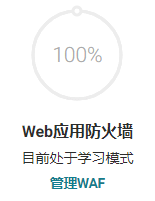
Go back to the firewall and show "currently in learning mode"
The scanning result suggests that there is a problem
3)After scanning, you may find many problems marked in yellow (below), indicating that the code of some files of the plug-in is different from the source file, but it is within the safety range, in most cases you can directly click "Always ignore", it is recommended to check the code differences and operate according to the situation.
This is usually caused by updating the plugin/theme and the code of the latest version is a bit different from the code of the previous version. Another reason is that the GPL or cracked version of the plugin is used, and the source file is written to the license key to activate or some code is added to block the verification step or something.
Click on "View the differences"You can view the codes with differences.
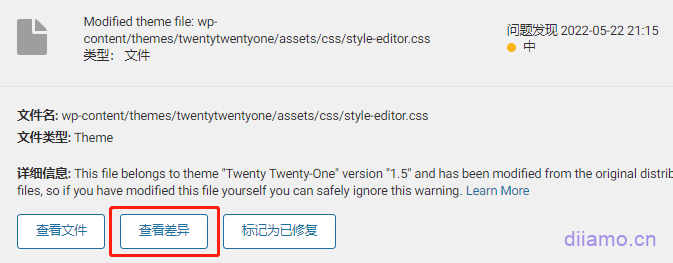
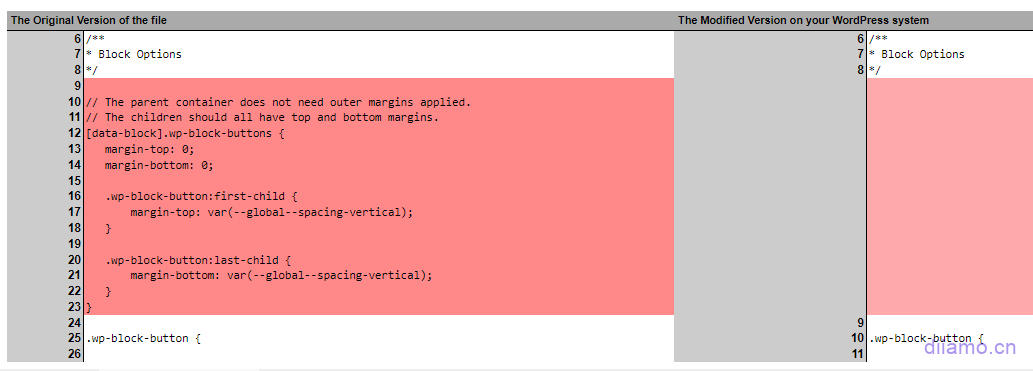
For example, the figure below shows a comparison of the file differences, the left is the source file, the right is the new file, the red background part means that the new file has less code than the source file. From the figure below, you can see that the new file has a few lines less CSS code (9-23 lines). css code does not affect security and so on, you can click "Always ignore".
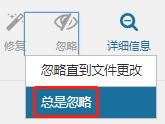
The orange background below indicates that the new GPL plugin file is partially different from the source code, the new file adds "PAID CURRENT" to bypass the plugin activation verification, the file is safe and can be accessed by clicking "Always ignore".
The green background part below indicates the code added to the new file than the source file, the code means the secret key key expires after 365 days, also to bypass the plugin activation verification, the file is safe to click "Always ignore".
If the problem is prompted by a red circle, there is a high probability that it is hung and the file needs to be deleted/restored. The situation depends on which file has the problem and what code has been added. If it's a file like readme, delete it directly, if it's a file like index.php, login.php, etc., download a brand new wordpress installation package and extract it, paste the corresponding file inside to overwrite the file that was hung, and clean up all the cache.
Access page blocked
FAQ4: If the following picture appears, it is blocked by the firewall by mistake. Directly check the box "I am certain this is a false positive", then click "Allowlist This Action", and finally refresh the page to return to normal.
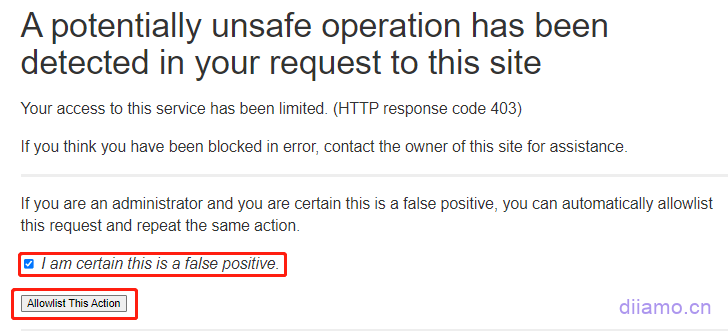
If the following picture appears, refresh the page directly and it will return to normal. If you can't refresh, enter the email address bound to your website according to the steps below and click Send unblocked email. If your website sends mail function abnormally, you will not receive mailbox, disable the plug-in through FTP or treasure panel, and enable it again after logging in the background.
It is recommended to add commonly used IP addresses to the wordfence firewall whitelist to avoid being blocked by mistake.

Scanning timeout, frequent alerts that plug-ins need to be updated
General server configuration card or lag will lead to insufficient resources scanning pause or failure, to solve the problem of server lag is the key, while optimizing the scanning task to reduce the pressure.
Click "Scan" ↓

Click on "Scan Options and Plans"↓

Select "Standard Scan" ↓

The following 2 ↓ do not check, scanning pressure is less, the new version of the plug-in code is not the same will not prompt. Do not just install plug-ins do not know the source!

Do not check ↓, there are plug-ins / theme updates Wordfence will not prompt (the background will still prompt). There are new plug-ins to update in time!
![]()
Check ↓ for much better security.
![]()
Check ↓ to reduce the pressure on the server.
![]()
Modify parameters↓

Tap the top right corner to save the changes.

Prompt "The last rule update for Wordfence Web Application Firewall was unsuccessful..."
6- If prompted with the following content: "The last rule update of Wordfence Web Application Firewall was unsuccessful", click "Manually Update".
Click "Refresh rules manually"↓.
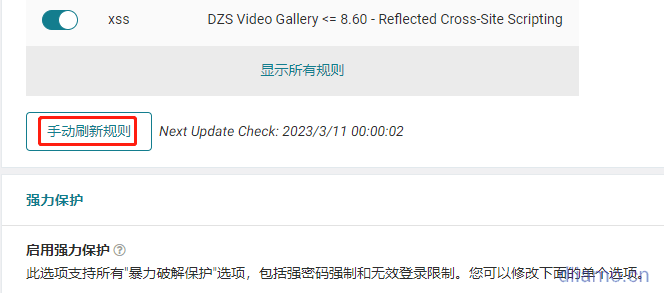
Prompt for successful update ↓.

If you want to solve the problem once and for all, watch this.Solution TutorialJust do what customer service says.
Google indexes useless pages with the /?wordfence prefix
Generates many useless pages with URLs prefixed with /?wordfence in the image below and is indexed by Google Google Search Console.

Solution: Add a line to the robots.txt file:Disallow: /*/?wordfence* The crawler can then be prohibited from crawling the appropriate page.

Audit Log is unavailable.
2024.11.05 New version of the new Audit Log function, you need to link to the official WordFence server (registered account verification license) to use, because we sell the GPL version of the official version of the official version of the non-official, so you can not link to use this function. It is recommended to set it to "disable" according to the following chart.
The function of this feature is to tamper with some core files will be intercepted, if you want to use this feature, go to buy the official official version.
You can turn off the "Audit Log" in the following figure.

Prompted to update the policy, clicking the button didn't respond
Clicking on the button below doesn't work, it keeps getting stuck on this page. It's because of "Enable "Let browsers load content only from your own site" in Pagoda > "Sites" > "Nginx Security Request Headers", just turn it off.


The installation is incomplete, click "Resume Installation" to enter the License.
This problem occurs when the object-cache.php file is incorrectly placed in the root directory of the website, just delete the object-cache.php file from the root directory. This problem usually occurs when the wp-content folder is wrongly selected as the root directory after relocating the website and selecting the file recovery directory.
Appearance>Menu can't add content, can't expand article product categories
Disable the WordFence plugin first, get the menu and then enable it.
The message "File appears to be malicious or unsafe".
Sometimes we will receive an email, prompting " File appears to be malicious or unsafe", that is, after the automatic scanning is completed, we found that some files are suspected to be viruses, so WordFence sends an email to notify us.
For example, some websites receive the following email, suggesting that a file is suspected to be a virus.
“This email was sent from your website “xxxxxxx” by the Wordfence plugin.
Wordfence found the following new issues on “xxxxx”.
Alert generated at Thursday 19th of June 2025 at 08:24:07 PM
See the details of these scan results on your site at: https://xxxx.com/wp-admin/admin.php?page=WordfenceScan
Critical Problems:
* File appears to be malicious or unsafe: wp-content/wp-cloudflare-super-page-cache/xxx.com/cached_html_pages/09379631cff41d7941666f756398b3f2cc31fb29.tmp

No longer an administrator for this site? Click here to stop receiving security alerts.”DeeSubmit a work orderContacted WordFence customer service, who said "Wordfence sometimes marks temporary .tmp files in the cache directory as "suspicious" because they are not in the normal file format or size, not because they have malicious code"
WordFence Customer Service Suggestion:
1- Manually check the file - open it and check if it contains standard cached HTML content. If it looks clean, you can safely mark it as a false positive in Wordfence. If it doesn't, delete the file.
2 - If these false positives are frequent, you can add the plugin's cached_html_pages directory to Wordfence's scan exclusions so that it doesn't prompt the same problem in the future.
Log in to the backend of the website and go to WordFenc to view the scan results, which will show the suspected virus files. Below the file there are "View", "Delete", "Ignore" and other functions.
Xiaodi has been using WordFenc on all sites for years, and has received similar alert emails about 7 times in total. Each time, manual troubleshooting revealed that it was a false alarm, so you don't have to be nervous, just click "Ignore" the problem or "Fixed".
Website hacking case sharing
Case 1.
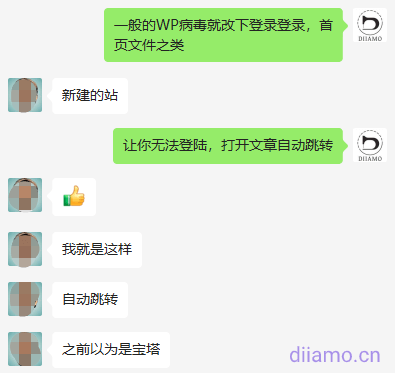
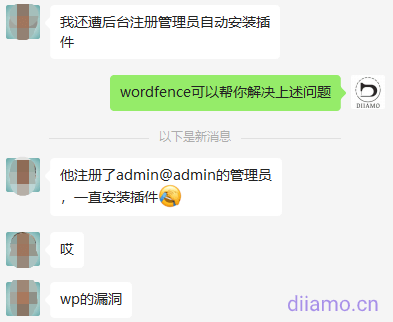
A visitor just purchased Wordfence plugin here in Diamo, and kept asking me whether it is safe, whether there is a backdoor and so on, and my intuition told me he has a story. Chat open found that his site has just been hacked paralyzed, want to buy our Wordfence plugin to save, worried that our plugin is not safe.
If he had previously purchased this plugin in the first place, odds are that the hack would not have happened.
Case 2.
I would like to share a case of a client's website being hung with Malicious Redirects, for your reference only. A 2C client's website was maligned, and when the background login page and all the pages of the frontend were opened, it would automatically jump to the website in the picture below. It was not possible to log in to the background, the page could not be opened, and the other two websites on the same server were also implicated.

The background login function is controlled by the wp-login.php file. When I couldn't log in, I went to check the source code of this file and found that more than 10 lines of malicious code had been added. I copied the wp-login.php file from the healthy site and overwrote it, and the login page is back to normal.
The home page is controlled by the wp-index.php file, check the source code and found that it is also hooked, copy the wp-index.php file from the healthy site and cover it, and the page opens normally and no longer jumps.
Use WordFence plugin to scan the whole site, prompted wp-load.php has a virus, compared to the source file found that the 107th line was added to the beginning of the malicious code, delete all the abnormal code.
Tip wp-content/plugins/wordfence/readme.md has a virus, check the latest plug-in installation package source files found that there is no such file, and readme.md file is generally a descriptive file does not have the function can be deleted, so directly delete.
After dealing with the threat and then scanning the whole site with Wordfence, it suggests that the Wp Rocket cache file has a virus, which should be a toxic file cached when the cache is updated regularly. Go directly to the Pagoda panel to delete the entire cache folder and let the cache plugin re-cache it.
Scan the whole site again with WordFence, prompting security and threat removal. Immediately change the backend login address, login username and password.
Reviewing this incident should be one of the customer's website login and password is too simple to be cracked. The client had found someone else to build the WP backend and did the front-end page by himself. Others randomly set a 4-digit administrator login name for him, and the password was also very simple, and no firewall plug-in was installed, so the security was very low.
This matter can not be blamed on the third party, he is only responsible for the installation of the background naturally will not take the initiative to install firewalls and so on, just get a simple administrator account just to allow customers to log into the background, it is reasonable that customers should create a new account to delete the old account. Customers can not get their own front-end to find us to build, we also do not want to meddle in the other content.
After the site was hacked, we help customers clean up the virus for free, set up a new account, install wordfence firewall plug-ins. It is also considered to learn from the mistakes of a long time wise, in the future, encounter this kind of thing first suggested that the customer to improve the security, although the security problem is not our fault, but still want us to deal with, simply get a good start.
One of the reasons why it is not recommended for white people to build their own website is here, using WP to build a website is very simple, but to do all aspects of the right need to be rich experience to do. Security installation and setup of Wordfence plug-in is basically OK.
Many scanners on the Internet automatically scan websites for vulnerabilities, enumerate login backgrounds and the like, and then hang mining programs or Trojan horses to jump to gambling/virus sites. Background login address must be modified not to use the default address, user name and password as complex as possible to set. It is recommended to install security plug-ins such as WordFence can greatly enhance the security of the site, but also to increase the 2FA security login verification.
WordPress many plug-ins are often exposed to major security vulnerabilities, even the well-known Elementor plug-in has been several times exposed to serious security vulnerabilities, the official emergency release of a new version to fix. Try to install a relatively high visibility plug-ins / themes, code is generally more standardized, the team behind the strength of reliable. Plugins, themes must be updated to the latest version in a timely manner.
If using cracked/GPL plugins and themes, be sure to antivirus first and buy them from reliable sources. For more details, check out theAre cracked plugins/themes (GPL versions) safe? What are the disadvantages? Where to buy reliably?》


